SCOM
Config Setting
Configuration Document
(Version 1.1)
Revision History
|
Date |
Version |
Description |
Author |
|
03 Sep 2010 |
1.0 |
Initial draft |
Sunil bansal |
|
08 Oct 2010 |
1.1 |
Modified to remove the technical details |
Sunil bansal |
Contents
4.1.1 Creating the New Config Setting
4.1.2 Editing the Config Setting
4.1.2 Deleting the Config Setting
4.2.2 Deleting the config task
1.0
Introduction and scope
The purpose of this document is to define the requirements necessary to create a Configuration set which includes the collection of various settings that are desired to be applied on one or more Xerox Devices. The settings that can be applied on a Device are classified to different features.
2.0
Audience
The audience for this document is assumed to be Xerox Program Development and Testing Teams who are responsible for the design and implementation of Configuration Sets of Xerox device. The Requirements document assumes that the reader is familiar with typical network management protocols (SNMP, HTTP, etc.), MIB-related terminology (OID, MIB, object, etc.)
4.0 Config
Main
Application interface contains two main tabs
· Configuration sets: To view/Add/Edit the configuration setting.
· Configuration Tasks: To define the Configuration task and running the task for the discovered devices.
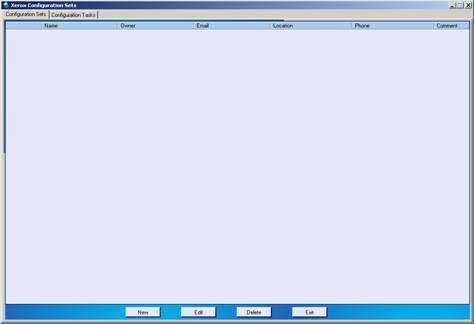
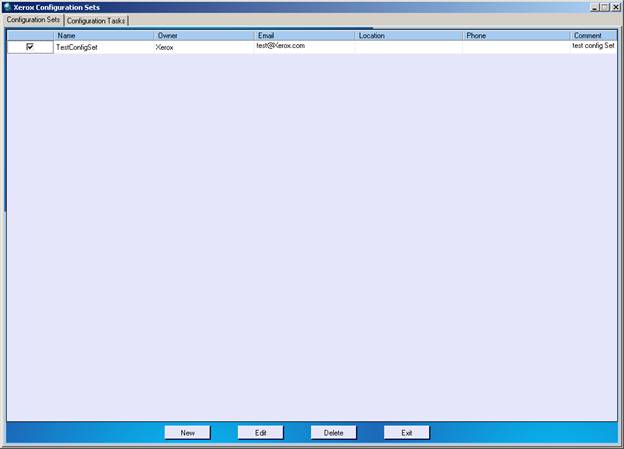
4.1
Configuration sets
Configuration sets tab is the dashboard to display or view all the configuration setting. Each setting will be saved with unique id and name.
Click on the new
button to enter the new configuration set. The New configuration
screen will open as shown below.
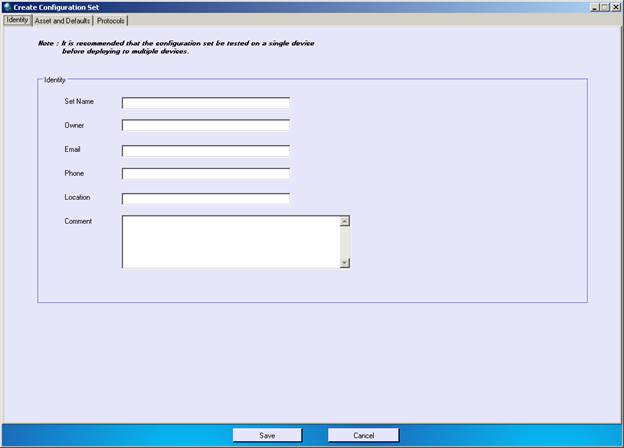
The screen contains
the three sections or tabs.
1.
Identity:
Identity tab
contains the set name which is the unique name to define the config
sets and other info like Owner, Email etc. These are the attributes
for the each configuration setting.
2.
Asset and
Default: In Asset
section, user can define Printer information, Feature Defaults,
Multinational related setting.
3.
Protocols: To define
the IP Network protocol, Other Network protocol, Print protocol,
Ldap Mapping related setting.
Note: There is single save for all the configuration sets
tabs/sections.
Enter the Identity information, Set name is
the name of the new configuration set.
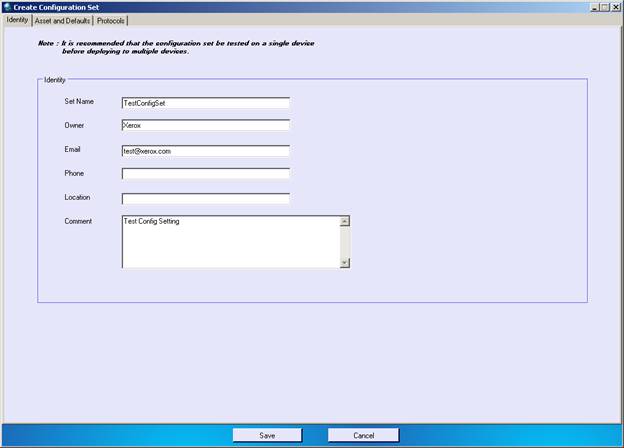
Enter the Set Name, this name will be unique
name to identify the configuration setting, once the configuration
setting is defined and saved, set Name cannot be edited in
future. Enter the Owner Name, Email Address, Phone
Number, Location and Comments (Description) to define the
Configuration Setting. Select the Checkbox to select the Setting and
then enter/select the corresponding values.
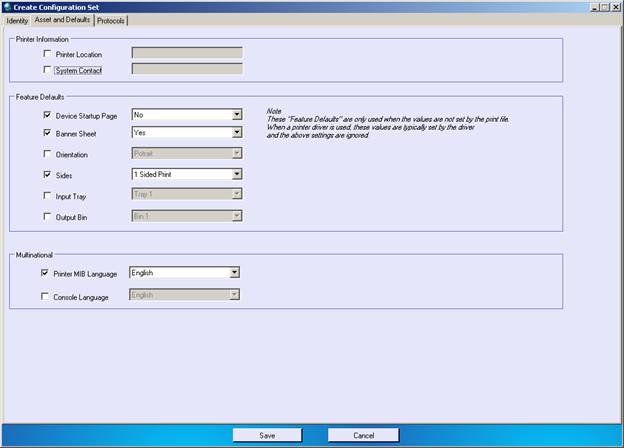
This tab contains the three sub section
·
Printer
Information
·
Feature
Default
·
Multinational
Printer Information
Printer Location: To set the printer Location selects the
corresponding checkbox and enters the printer location in the
respective text box.
System Contact:To set the System Contact selects the
corresponding checkbox and enter the System Contact in the
respective text box.
Feature Default
Device Startup Page: Default value
are Yes (3), No (4). To set the Device Startup Page selects the
corresponding checkbox and selects the value “Yes “.
For not setting the Device Startup Page selects the
value “No”.
Banner sheet:
Default value
are Yes (3), No (4). To set the Banner sheet selects the
corresponding checkbox and selects the value “Yes
“ For not setting the Banner sheet selects the
value “No”.
Orientation:
Default value is
Portrait and Landscape. To set the Orientation selects the
corresponding checkbox and selects the respective value from
dropdown.
Sides:
Default
value are 1 Sided Print(1),2 Sided Print(2),2 Sided Print,
Flip on Short Edge(3),Unknown(4) and Other(5).To set the sides
selects the corresponding checkbox and selects the respective value
from dropdown.
Input Tray:
To Set the Input
Tray, selects the corresponding checkbox and selects the respective
value from dropdown. Default Values are Tray1 to Tray11.
Output Bin:
To Set the
Output Bin, selects the corresponding checkbox and selects the
respective value from dropdown. Default Values are Bin1 to
Bin11.
Multinational:
Default values
are English(1), Spanish(2), French(3), Italian(4), German(5),
Portuguese(6), Japanese(7), Mandarins(8). To set the console
or MIB language, selects the corresponding checkbox and selects the
respective value from dropdown.
In this section I used to define the Protocol related setting
and retrieves the LDAP Mapping.
There are four sun sections/tabs 1.
IP Network 2.
Other network 3.
Print 4.
LDAP Mapping
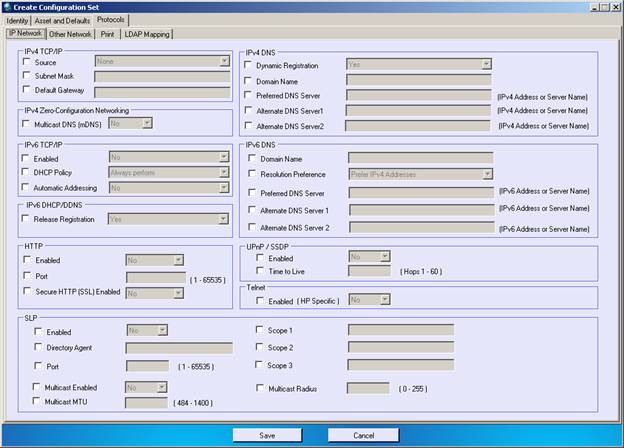
1. IP Network:Define the IP network protocols Like IPv4,
IPv6, Http, SLP, UPnP/SSDP and Telnet.
IPv4TCP/IP
Used to set the
IPv4 TCP/IP related configuration on the device, Default values for
source are none(1), other(2), static(3), RARP(4),
BOOTP(5), DHCP(6), DHCPAutoIP(7), AutoIPv6(8). To set
the values select the checkbox and enter the corresponding
values
IPv4 Zero config N/W
Used to set the
IPv4 Zero configuration networking related property, Default values
are Yes (1), No (2). To set the values select the checkbox and
enter the corresponding values
IPv4DNS
Used to set the
IPv4DNS related properties to the device like Multicast DNS,
Dynamic Registration, Domain Name, Preferred DNS Server, Alternate
DNS Server1, and Alternate DNS Server2, to set the values select
the checkbox and enter the corresponding values
IPv6 TCP/IP
Used to set the
IPv6 TCP/IP related setting on the device. Default values for DHCP
Policy are Use DHCPv6 as directed by a router(1), Always
enable DHCP for address assignment(2), Always enable DHCP for other
configuration data(3), Never use DHCPv6(4). To set the values
select the checkbox and enter the corresponding values
IPv6 DHCP/DDNS
Used to set the
IPv6 DHCP/DDNS related property, Default values are Yes (1), No
(2). To set the values select the checkbox and selects the
corresponding values
IPv6 DNS
Used to set the
IPv6 DNS related setting on the device. Default values for
Resolution preference are prefer IPv4 addresses (1), prefer IPv6
addresses (2). To set the values select the checkbox and enter the
corresponding values
HTTP
Used to set the
Http related setting on the device like enabling the Http, Setting
the Port and enabling the secure http. To set the values select the
checkbox and enter or select the corresponding values
SLP
Used to set the
SLP related setting on the device like enabling the Directory
Agent, Setting the Port , scope and Multicast enabling ,
Radius and MTU. To set the values select the checkbox and enter or
select the corresponding values
UPnP/SSDP
Used to set the
UPnP/SSDP related setting on the device, to set the values select
the checkbox and enter or select the corresponding values
Telnet
Used to set the Telnet related setting on
the device. To set the values select the checkbox
and enter or select the corresponding values
2. Other Network:Define the Other network protocols Like
Apple Talk, MS Networking,
WINS
and Netware.
AppleTalk
Used to set the AppleTalk related setting
on the device, like enabling the apple talk, printer type and
setting the zone. To set the values select the checkbox and enter
or select the corresponding values
Microsoft Networking
Used to set the
Microsoft networking related setting on the device like Connection
Mode, Work Group, Share Name, Share Name comment, Host name, Host
name comments, Maximum Connection, Connection Timeout, to set the
values select the checkbox and enter or select the corresponding
values
WINS
Used to set the
WINS related setting on the device, like enabling the WINS, setting
the primary or secondary server, to set the values select the
checkbox and enter or select the corresponding values
Netware General & Netware SAP
Used to set the
Netware General and Netware SAP related setting on the device, like
enabling the Network general setting on the device, defining the
filling transport, Frame Type, polling intervals, printer server
etc. To set the values select the checkbox and enter or
select the corresponding values
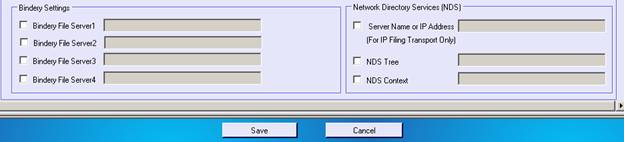
Netware Bindery Setting and NDS
Used to set the
Netware Bindery and Netware Network Directory services setting
related setting on the device, User can define up to four Bindery
File server and Network Directory services server, NDS Tree and NDS
context. To set the values select the checkbox and enter or select
the corresponding values
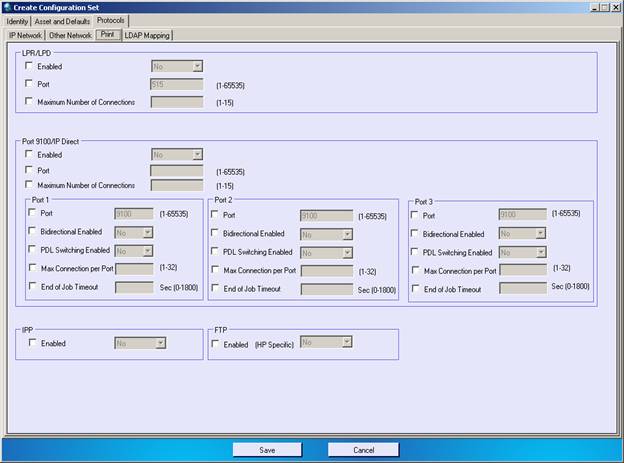
3. Print Network:Define the print network protocols Like
LP/LPD, Port 9100/IP direct, IPP and FTP
LPR/LPD
Used to set the
LPR/LPD setting on the device, for enabling select “yes” and for
disabling Select “No”, user can also change the port or specify the
maximum connection. To set the setting, select the checkbox and
enter or select the corresponding values.
Port 9001/IPDirect
Used to set the
Port 9001/IPDirect setting on the device, for enabling select “yes”
and for disabling Select “No”, There are three ports for Port
9001/IPDirect, user can set the setting for each port separately
like defining the port number, enabling the Bidirectional, enabling
the PDL Switching, defining the Maximum Connections per port and
end of job timeout value. To set the values select the checkbox and
select or enter the corresponding values
IPP
Used to set the IPP Setting on the Device,
to set the values select the checkbox and select the corresponding
values
FTP
Used to set the FTP Setting on the Device,
to set the values select the checkbox and select the corresponding
values
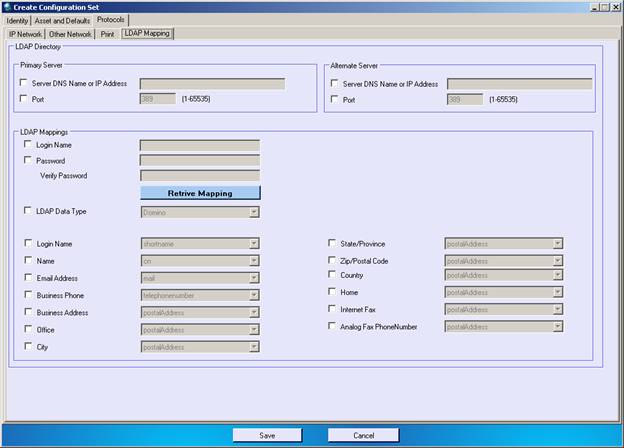
4. LDAP Mapping:
LDAP mapping Screen is used to login to the LDAP Server and
retrieve the LDAP setting and populate to the corresponding combo
box, then user will select the setting and save in order to apply
to the selected devices.
To retrieve the LDAP setting,
·
Enter the Primary or Alternate of the LDAP server IP or Server
Name,
·
Enter Login Name and password of the LDAP server
·
Click on “Retrieve Mapping button”
System will fill fetch the properties and fill in the
corresponding fields.
Note: Initially Default values are set, so the user can set the
default values or retrieve the Existing properties.
Click on “Save” button finally and the Configset
will get created. In order to abort from creating the new config
set, click on “Cancel” Button.
To Edit the saved Config Set
·
Select the Saved Configset
·
Click on Edit Button
·
Modify the setting
·
Click on “save” in the Edit screen.
Note: Only one config set is edited at once. Do not select
multiple for editing.
To delete the Config Setting
·
Select one
or multiple config setting
·
Click on
“Delete” button to delete
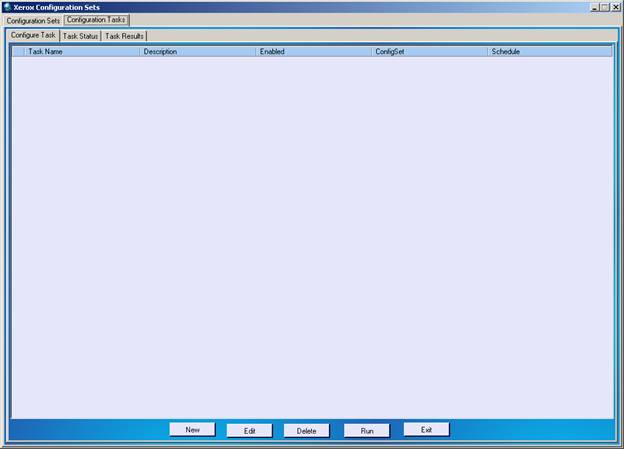
Configuration task section is used to following
activities. 1.
Create/Edit/ Delete the
configuration task and map the task to the defined /saved
configuration sets. 2.
Run the task 3.
Schedule the task 4.
View the Task
Results. Click on the new
button to define the new Configuration task.
In “configuration Task” tab, go to “configure
Task” sub Tab and click on “New” Button
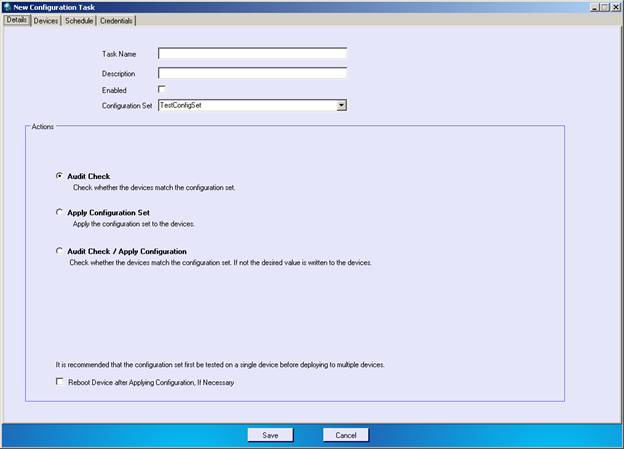
1. Details: Enter the Task name
i.e. the unique name to identify the task, respective
description. User can enable or
disable the particular task, if it is enable then only the task is
will be executed. There are three
types of actions 1.
Audit check: Does get operation and audit the devices, and
raises the warning if the same value is already set to the
devices. 2.
Apply: Does the set operation on the device. 3.
Audit and Apply:Does the get and set operation of the config
setting on the selected device Check “Reboot Device after Applying
configuration” check box if reboot of devices is needed after
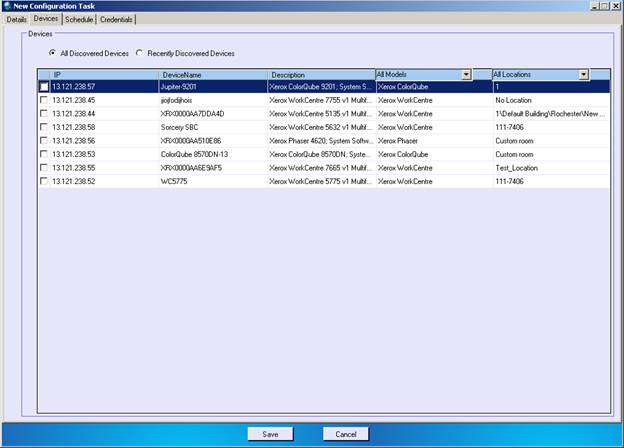
applying the configuration. 2.
Devices: Device section/ sub tab is used to discover
the device on the network within the IP range defines in the SCOM
database.
o
“All discovered devices” radio button is used to
display all the discovered devices on the network.
o
“Recently discovered devices” radio button is
used to display recently discovered devices (Last 24 hr) on the
network.
o
Select one or multiple devices.
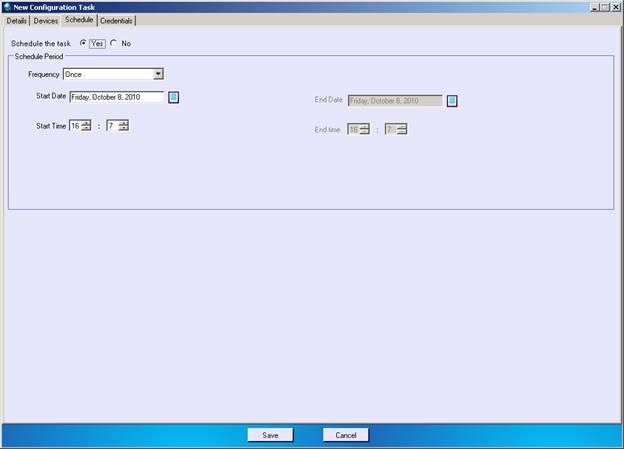
3. Scheduling the Task:
Schedule tab is used to define the Schedule
period in order to run the task by the scheduling service.
To schedule the task select the “Yes” radio
button. And then select the frequency. Frequency contains four values to schedule the
task. 1.
Once: To schedule once
to the specified date and time. 2.
Hourly: To schedule
every specified hour from start date time to end date time. Ex:
Hourly, Every 4
hour Corresponding task will
be run every four hour continuously from start date time to End date time 3.
Daily: To schedule every
specified day from start date time to end date time. 4.
Weekly: To schedule
every specified week from start date time to end date time. Note:
o
Task will be automatically picked by the service
and will get executed; no user interaction is required to run the
task.
o
To view the result, go to Config set application
and view the results as specified in the below sections
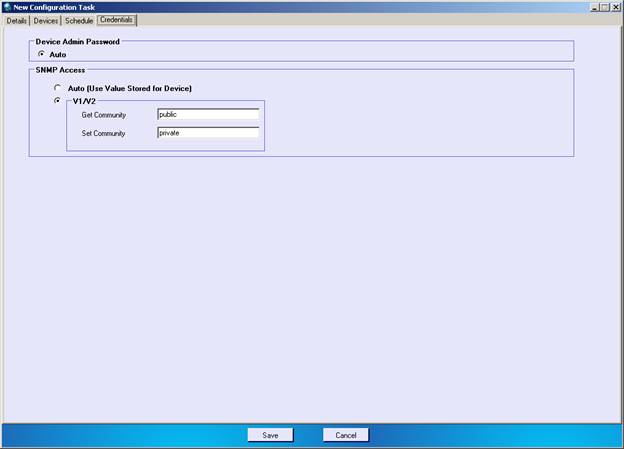
4.2.4 and 4.2.5 4. Credentials: Credentials section is used to define
the device credentials and SNMP access.
Now click on “Save”
button to save the configuration task.
For editing the Config Task
o
Select the saved “config Task”
o
Click on edit button
o
Modify the setting
o
Click on save button. To delete the Config task
o
Select the single or multiple tasks
o
Click on “Delete” button
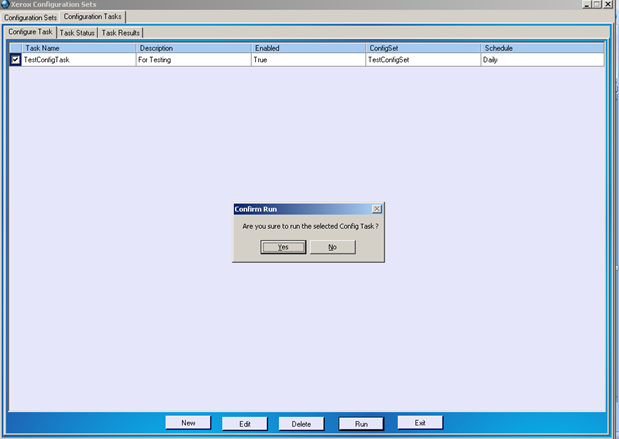
To run the Task
o
Select the Saved Task
o
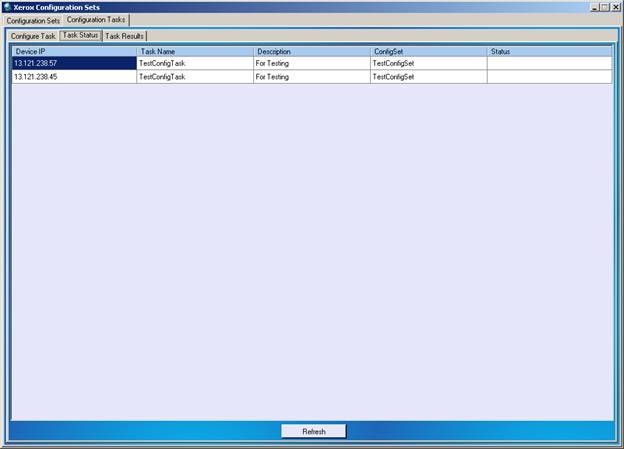
Click on “Run button” To view the Task Status
o
Go to “Task Status” Tab under “Configuration
Task” Tab.
o
Click on “Refresh” button to view the Task
Status
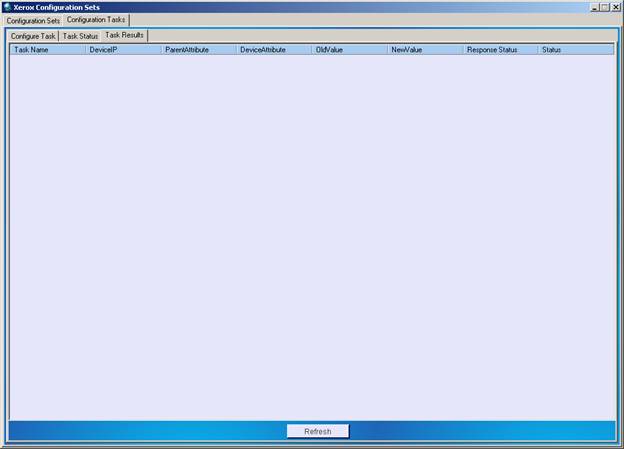
To view the Task Result
o
Go to “Task Result” Tab under “Configuration
Task” Tab.
o
Click on “Refresh” button to view the Task
Result
Step 1:
Run the Setup CentreWare
Management Pack for Microsoft System Center Operations
Managerv1.0.36_32Bit.msi (32 bit m/c)
OR CentreWare
Management Pack for Microsoft System Center Operations
Managerv1.0.36_64Bit.msi (64 nit m/c) Note: Uninstall
the previous CentreWare Management Pack (From the control
panel-> Add or Remove programs) before running the setup.
Step2:
Connection string.
Application
will access the database using
Windows authentication. For changing to
SQL Server authenticationchange the connection string in
xrx_ConfigurationSetting.exe.config and
ConfigSettingSchedulerService.exe.config file. (C:\Program
Files\Xerox\CentreWare Management Pack for Microsoft System Center
Operations Manager\ConfigSet)
*************************** End
************************************* 
4.1.1
Creating the New Config Setting
4.1.1.1
Identity
4.1.1.1
Asset and Default
4.1.1.1
Protocol

4.1.2
Editing the Config Setting
4.1.2
Deleting the Config Setting
4.2.
Configuration Task
4.2.1
Create the config task
4.2.2 Edit
the config task

4.2.2
Deleting the config task
4.2.3 Run
the Task
4.2.4 View
the Task Status
4.2.5 View
the Task Results
6.0
Deployment